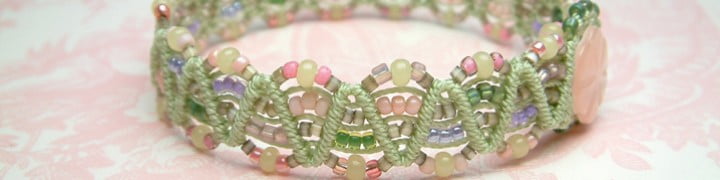
I’ve been so wanting to do a tutorial and I finally decided on this cute little macrame bracelet. It’s based on the knotted bracelets you see in tourist shops. They’re very simple to make and depending on the cord and beads you choose, you can design them to suit your style. They also make great gifts because of the somewhat adjustable length on the sliding clasp.
Just about any kind of cord and beads will work as long as the bead holes are large enough for two cords to fit through. Only one knot, a simple square knot is used throughout. The sliding clasp is as simple to finish as the bracelet and the entire project can be done in one episode of American Idol or whatever you fancy TV wise.
- clipboard with a piece of foamcore or cardboard cut to fit
- 4 yards cord (I used C-Lon Tex 400 for this demo)
- 8 or more beads depending on length of bracelet
- 2 smaller beads for dangles
- 3 straight pins
- scissors
- needlepoint needle for finishing (has a round ballpoint end)
- needlenose jewelry pliers (optional)
1) Cut 2 pieces of cord about 24″, hold together and clip them under the clipboard about 8″ from the one end. These will be the filler cords. I’m using a shade of lavender for my filler cords.
Cut one piece of cord about 2 yards long. This will become the knotting cords. Normally I use the same color cord for both filler and knotting cords, but just for this demo I’m using a dark shade of purple for the knotting cords. Find the middle of the knotting cord, slip under the filler cords and pin to foamcore board. Now we’ll begin working square knots with the knotting cords over the filler cords.
2) I’m right handed so I usually start with the cord to the right side of the filler cords. Lay it over the filler cords horizontally forming a loop on right. Take left cord and place over horizontal cord, then underneath all cords and up through loop on right. Pull both knotting cords out and tight. That’s 1/2 of the square knot.
3) Repeating step 2, but take the left cord and lay over the filler cords horizontally forming a loop on left. Take right cord and place over horizontal cord, then underneath all cords and up through loop on left. Pull both knotting cords out and tight. You just made one complete square knot.
4) Continue making square knots and placing a bead on the filler cords after every 3 to 5 square knots. The number of knots depends on the size of cord, the size of the beads and however many knots looks pleasing to you. Continue this pattern to the desired length. Keep in mind that the sliding clasp will add about 1/2″.
When you’re done, thread one knotting cord on to your needle and sew up the center as far as you can. If you have trouble, use a pair of jewelry pliers to pull your needle through. If you find that your knots are very tight and you cannot sew the entire cord through, unravel the 3-ply cord and sew each thread up individually. After neatly sewing up both knotting cords, trim off the excess.
5) Next we’ll make the clasp. Form your work into a circle and hold together by loosely tying with a bit of cord near both edges of knots (I used orange). Pin bracelet to foamcore.
Cut a cord about 12″ long. Just as you did in step 1, slip this cord under all four cords and work square knots over all four cords for 1/2 inch. Finish ends off just like you did with the bracelet. While sewing these ends in, be sure to avoid putting needle through the cords that are encased in clasp.
6) Remove those bits of temporary cord. There are 2 loose cords coming out of each end of the clasp section. Hold 2 cords together and form a slip knot, place a bead on both cords, then form another slip knot to hold in place. Trim off the excess. Run around and show off to everyone you know.
If you have any questions, please let me know. I’d be happy to help you. I didn’t design this bracelet, in fact I disassembled one of those inexpensive tourist versions just to see how they finished off the ends. So feel free to work up this design to your heart’s content.
Cheers, Monica
-
Woah! I’m really enjoying the template/theme of this website. It’s simple, yet effective.
A lot of times it’s hard to get that “perfect balance” between user friendliness and visual appearance. I must say you’ve done a superb job with this.Also, the blog loads super quick for me on Internet explorer.
Exceptional Blog! -
Monica, you are an answer to a prayer… thank you soooooooooooo much for this. <3
-
Thanks so much for this- I’m a silversmith, but have been looking for simple projects to do with my daughters…
-
I’ve been looking for something like this for awhile. Didn’t think I’d find it in my own backyard. You have saved me a million headaces. I used to macrame before like for hanging plants but never could figure out how to do the end of the bracelet. I kept wondering how to make it so that the strings a the end would open & close the darn thing. now I know. Thanks to you.
I will remember this website forever.
Thanking you sincerely,
Nidia -
Hi, could I know what type of string you’re using?
-
My bracelet twisted. Can anyone help please?
-
Alternate the sides you take the string from. Once start from the left, the next start from the right . This completes the knot which is what you want. Continue alternating the sides you start from. Over from left. Next time over from the right. hope that helps.
Sincerely,
nidia
-
-
Someone on one of my groups gave me this link so i could start making bracelets omg i am so thankful as your tutorial was so easy to follow (i have tried youtube and all usual places) i am now making my first ever bracelet using the square knot and i am so excited. thankyou so much xxxx
-
Such a brilliant tutorial – I needed some refreshment as it has been yrs since I had made bracelets & your tutorial was amazing. Thank you for putting it “out there”
-
Pingback from Practical Crafts: Bracelet Bonanza | lq0.info on August 10, 2012 at 3:30 pm
-
I am confused in the beginning with the 8″. Do I clip 8″ down from the top of the filler cord and have 16″ that I will be knotting over?
-
YeS
-
-
Hi Monica,
I found your tutorial when looking for an answer for a way to fix a sliding knot macrame bracelet I purchased at the Field Museum in Chicago. It was a very inexpensive scarab bracelet from Egypt which I didn’t open until returning home to Rockford, IL. When I pull it to fit my wrist, it doesn’t stay closed at all. I have temporarily solved the problem by tying a knot around the center knot which works but is very inconvenient when removing. Can you offer a better solution for my problem? I would really appreciate any ideas you might have.
Thanks, Barbara
-
Lovely clear, calm tutorial, thanks so much. I was confused only with the “8″at one end, but figured that out later … and thats the way I learn. Appreciate this a lot!
-
Dear Monica, I just finished my first macrama bracelet and I can’t thank you enough, it came out fairly nice..I still need to practice,,, my macrame clasp needs more practice but it works…thanks for sharing..
-
Love it! Just what we were looking for to start off with. Great tutorial.

L -
Hi Monica- thank you for this tutorial. It has solved the mystery of what to do with pesky ends.
Now to master the tension of my knots! -
I just whipped out a couple of these using hemp…thanks so much for the tutorial!
-
Hi Monica.. tutorial was wonderful – thanks for sharing! I just started my first project and I am confused as to how to finish the ends? I understand that you are threading the knotting cords back up into the ends, though what do you do with the two filler cords which are left on both remaining ends? and for the fact that I had a heck of a time trying to get my needle point needle in through my knots without having to unravel that portion of my work
Thanks in advance for your help!
D -
GRACIAS MONICA, ESTOY BUSCANDO PARA HACER PULZERAS EN MACRAME Y DE TODAS LAS QUE HE VISTO, LA DE USTED ES LA MEJOR. SI SABES DIFERENTES PUNTAJES LE AGRADECERIA QUE LOS PUSIERA PORQUE PARA MI ES USTED LA MEJOR MAESTRA. AL FINAL, LOS HILOS AZUL COMO ES QUE NO SE VE EL FINAL DEL HILO AZUL CUANDO ALAS EL COLOR LAVENDER PARA YA TERMINAR? (VEMOS EL FINAL DEL COLOR LAVENDER CON SU PIEDRITA, PERO CUANDO SEPARO EL ULTIMO PUNTAJE AZUL DONDE O COMO HIZO PARA CUANDO CORTO EL AZUL QUE NO VEMOS MAS. GRACIAS
-
Dear Monica,
I came across your blog and I think you make the most beautiful Jewelry. Years ago I did allot of Macrame. It looks as though the knots are the same. I am looking to make a belt and possibly straps for a purse. I am going to practice my knots using your tutorial. I am having a hard time finding the basic supplies I need to begin this project. I wondered if you ever made larger items?
Julie
Novi, Mi. -
Is there a pattern for the bracelet pictured at the top, its beautiful!!!
-
Thank you for showing me this, I’ve wanted to know for awhile how to do the connection on the bracelet. Now that I know how easy it is, I will be making them for everyone in Family, your great.
-
-
I just taught my 8 yr. old grandson to macrame using your instructions! He’s thrilled that he can “tie knots” with the best of them. Thank you!
-
Pingback from How to make a macrame bracelet « jewelryrage on March 28, 2012 at 9:43 am
-
Brilliant just made one in super quick time thanks for a great tutorial
-
Hi Monica,
I am a complete newbie at jewelry making (bracelets in particular) and have recently watched a few YouTube videos in a quick attempt to learn how to make a square knot etc. With your help, I have not only learned how to make a square note, but a complete macramé bracelet. Laughing, I’m a Corporate Trainer by profession, so I truly can and do appreciate your tutorial; it was easy to follow. I am so excited by the idea of mastering this technique/style. Thank you!!!
-
I cant find the C-lon Tex 400 cord. Not at Hobby lobby, michaels or Joanns. Where do you get it or order it? I am looking for a cord that is thicker than embrodery floss but thin enough for beads!
-
try ebay, some on there
-
C-lon can be purchased on Amazon.com, they have a few colors by the single spool, if you become hooked you can buy three shade variations in packages of a dozen spools, oranges and yellows, blues and neutrals, pinks and purples. the dozen kit is a savings over the single spools if you are hooked. C-lon is actually finer than embroidery thread but much tougher. Im not sure about the tex 400 variety though. joanns has hemp, bamboo, and cotton cords that are a bit thicker than embroidery thread and have much more body.
-
-
Thanks for your great tutorial! I was a macramer years ago; belts, planters ect back in the 70s! Love the slide knot and am heading to hobby lobby to get the cording! What I would really love to learn in how to make the bracelet at the top of your page…….. the one with the small beads! next tutorial???
jan -
hi Monica
I must admit as much as i like making things I’m not very good with following patterns. I’ve been looking for a beaded door curtain and all the ones I’ve looked at have put me of trying but after seeing your tutorial and being able to follow it so easily I’m going to try to use it to make my curtain.
thanks Stacey
-
Hello,
I am a little confused on how to sew up the knots….how can this be done????
Thanks,
Sharon
-
Hi Monica!
Thank you so much for this fabulous tutorial! I have been looking for about an hour on the internet to find a way to finish off bracelets and none of them have made much sense to me, as I have never done macrame before! But this is really helpful and clear, so thank you!
The thing is, I am going to be making mine in leather, so of course the thing I am worried about it the sewing back through. Do you have any ideas on how this might work? Most of the bracelet is not going to be macrame, but have a Sterling silver ring as the focal. I just thought that the macrame clasp looks so much more professional and pleasing to the eye.Anyway, hope you can help!
Thanks for your time,
Carolynne. -
Where do you find the cord at you used in the demo? I’ve always used hemp but would like to try this stuff out as well.
-
i tried it with normal string and it sort of twisted up.
-
Can you do this with normal string? By the way your tutorial ROCKS!!!!!!!
-
Thanks for the great instructions & pictures – VERY helpful!
-
Just got back from Mexico 4 days ago from where I purchased 10 bracelets like the one in your tutorial. My friends LOVED them, so I decided to go online to see if I could find directions on how to make them, myself. Within a few minutes, I found Smitten By a Knot and your tutorial. Thank you so much…can’t wait to make one. (I have never tried macramé before
-
hola, me gustan muchos los pulcera de macrame se como terminarlas pero como hago para que el hilo se desteja y aseguro para que el cierre no se rompa que productos o intrumentos usas para hacer el cierre y donde lo consigo . muchas gracias
-
Hello Monica
I have been making bracelets with waxed cord and have such a problem finishing them.
I usually use a bead on one end and a loop to hold the bead.
However the beads tend to come loose.
I am hoping I can grasp the clasps you use that would be so much easier.
Sue -
How do the ends on the slide fastener not pull back out? I am thinking glue might not work there because of the pull thru ends of the bracelet. Thank you for all the information you have posted. It is very helpful.
-
Hola soy Roser, no entiendo como hacer la parte del cierre .Besos
-
Tengo problema con el ingles,podrias traducirlo.Macrame habia hecho tiempo a… pero la forma de acabarla no lo veo claro.Muchas gracias por adelantado.
-
Muy linda la pulsera te felicito
-
Pingback from diy: macrame & washers on July 21, 2011 at 2:51 pm
-
I just came across your tutorial and I too was wondering how to make the clasp. I want to make some graduations gifts for my daughters friends (40-50) next year so I need to use something that will end up only costing less than 50cents or less. Could you use embroidery floss and not use such large beads? These will be for girls and guys.
Also thanks for the great close up pictures
-
Thank you so much for this tutorial! I can’t wait to give a whirl.
-
Hi Monica,
I’ve been looking for instructions on how to do a slide clasp, but because I didn’t know the name, it was hard to find any. I’m really glad I found yours, they’re very easy to follow. I appreciate your taking the time to post this tutorial.
Thank you,
Deborah -
I’ve been looking everywhere on how to finish off this type of bracelet and you explained it so easily. Thanks!
-
Monica,
thank you so much for this tutorial! It’s very clear and easy to follow, great pictures help too! I am seeing lot of these bracelets now and wanted to make one for myself. They look really cool!
Thanks
Hana -
Thank you for writing this tutorial! I’ve seen some really beautiful, elegant bracelets which I now know were made like this (pave beads, faceted beads, etc.) on the internet but could not find out how to make them! One bracelet I found looked like it was made with a satin cord, but it seems like it would be difficult to find beads with holes to accomodate that. I’ve ordered some C-Lon, and look forward to the variety of styles from fun to elegant that I think you can make with your tutorial. Thank you!
-
Hi Monica,
Thank you so much for sharing this great pattern with pictorials. I can’t wait to make my first bracelet.
Thank you again!!
Barbara -
This tutorial is very helpful!
I have had the problem of my cords coming untied even when they are glued which also looks messy. When you are sewing the knotting thread back through the knots is the point to try and go straight up and through the middle coming out all the way at the opposite end? Do you ever use glue?Thanks so much.
Best,
Jane -
Can you just melt/burn the ends
-
Hello thanks for posting this tutorial. I am looking forward to getting started.
Just a few questions before i begin.Does it matter what size needle i use? as long as it has a ballpoint end
Do i have to use square/rectangular beads? i was hoping to use some beautiful daisy beads but they are round at the back were the hole is, could this work? they are made of flymo clay.
Thanks for your time
Look forward to hearing from you


88 comments
Comments feed for this article
Trackback link: http://smittenbyaknot.com/2011/01/01/easy-macrame-bracelet-tutorial/trackback/